
How to Buy a Domain in the Riki Domains Web Panel: Step by Step
Buying a domain in the Riki Domains web panel: top-up in Billing, search by category, checkout with the WHOIS option, the domain card and the first DNS record.
This guide is based on a real purchase in the Riki Domains web panel: on 18 October 2026, in a fresh account registered with a login and password, we topped up the balance by $5, bought rikiguide-panel.top for $3.35 and added the first DNS record. On 14 November 2026 the panel got a new design, and the screenshots were retaken in the same demo account: search and checkout are shown on rikiguide.top without payment, while the domain list, card and DNS show the domain bought back then. How to get into the panel and what is inside is covered in a separate guide; the same path in the Telegram bot is covered here.
Step 1. Top up the balance
Purchases in the panel are charged to the balance, so Billing in the left menu comes first. The amount goes into the "Amount, $" field next to the Top up button, $10 by default; in our example we topped up $5. The panel creates an invoice and takes you to the payment page. An unpaid invoice does not disappear: it stays in the operations history as pending, with a button to pay it.
On the payment page you pick a coin: USDT (TRC-20 and BEP-20), USDC, BTC, ETH, TRX, BNB or POL. After the choice the amount in the coin, the address and a QR code appear, and the rate is locked for the payment window. Send exactly the amount shown: crediting is automatic, and after the network confirmation a "Balance top-up (gateway)" line appears in the history. If a different amount arrived, for example the exchange deducted its fee, support credits the payment manually; details in the support guide.
Step 2. Find a domain
The Buy a domain button is in Quick actions on the Overview screen and in the Domains section. In the search you type a keyword or a full domain and choose a category: Standard, Platinum, Titan or Special (fixed prices, opens after $500 in total top-ups). The panel checks availability across the category's zones and shows a list with the first-year price and an Add to cart button on every row, with the cart block on the right.
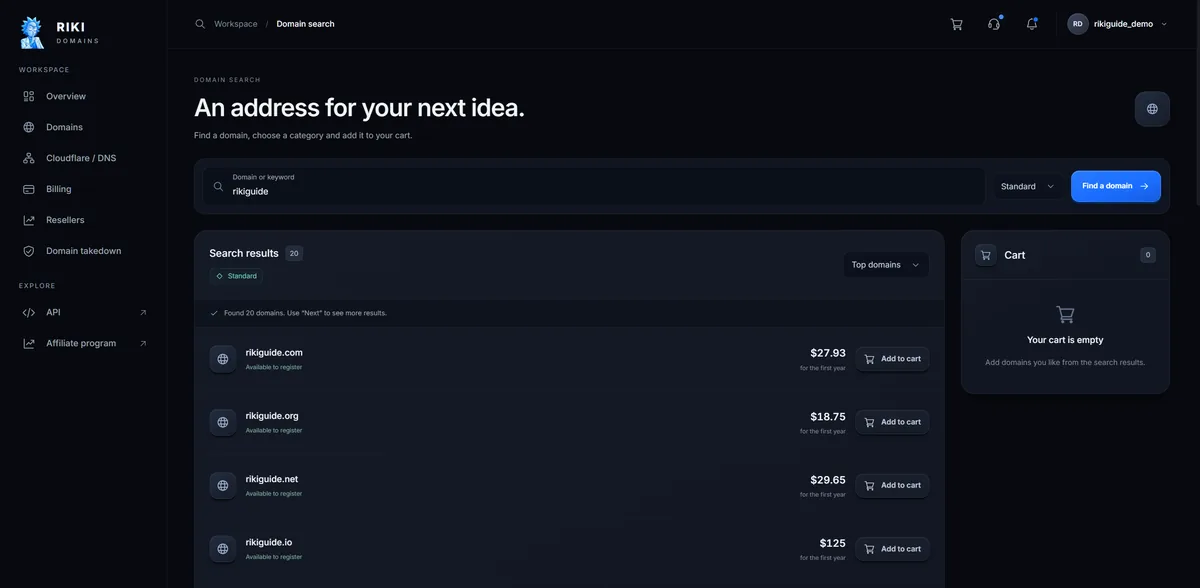
In our example the keyword rikiguide returned 15 options: from .top at $3.35 and .xyz at $4.98 to .ai at $400. The full list of zones with prices is in the table.
Step 3. Checkout and the privacy option
After Add to cart the domain appears in the cart block on the right, and the cart icon in the header shows a counter. The cart button leads to the Checkout page with three steps: choose domains, order settings and payment. Each domain is a separate card: the plan, "1-year registration" with the price and the "WHOIS Privacy for $10" switch, which hides your details from public WHOIS. Privacy for standard zones is enabled exactly here, before payment; for the 18 October purchase we did not enable it, so the domain card shows the WHOIS status as Public. On the right are the order total, a promo code field and the Pay from balance button.
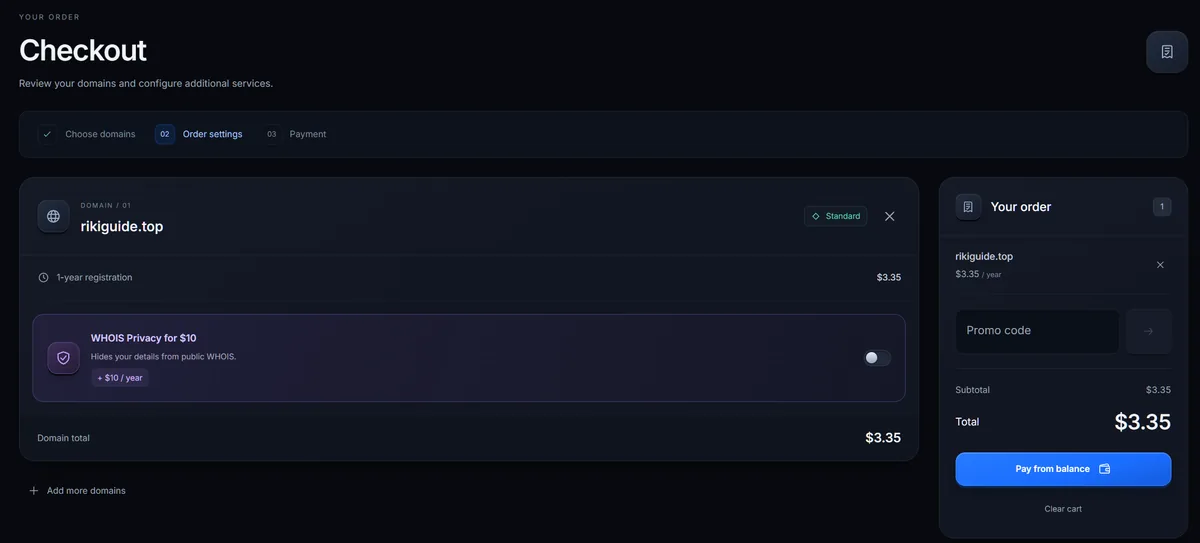
Step 4. Payment and registration
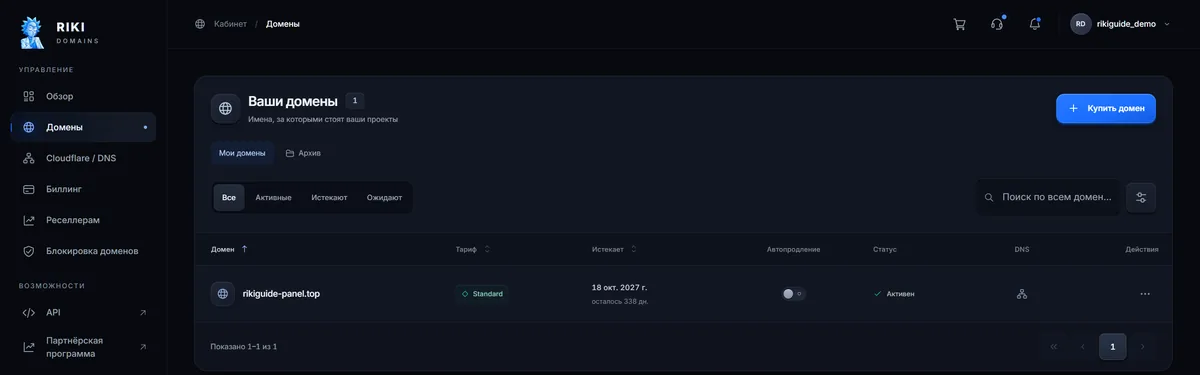
Pay from balance charges the order total, and the domain goes to registration. In the 18 October purchase the new domain appeared in the domain list right away with the status Processing, and about 20 seconds later it changed to Active, with the expiry date, 18 October 2027 in the example, and the renewal price. The screenshot below is from the Russian interface; the panel also runs in English.
Step 5. The domain card
Clicking the domain opens its card. The Info block: purchase date, expiration date, renewal price, purchase price, WHOIS status, auto-renew, DNS update date and the nameservers with a Change NS button. On the right is the DNS records block. At the bottom are three cards: Auto-renew with a switch and its cost, Archive (Move to archive hides the domain from the list in the panel and the bot while registration, DNS and renewal keep working) and Delete domain: the domain is deleted at the registrar, with no refund for the remaining period.
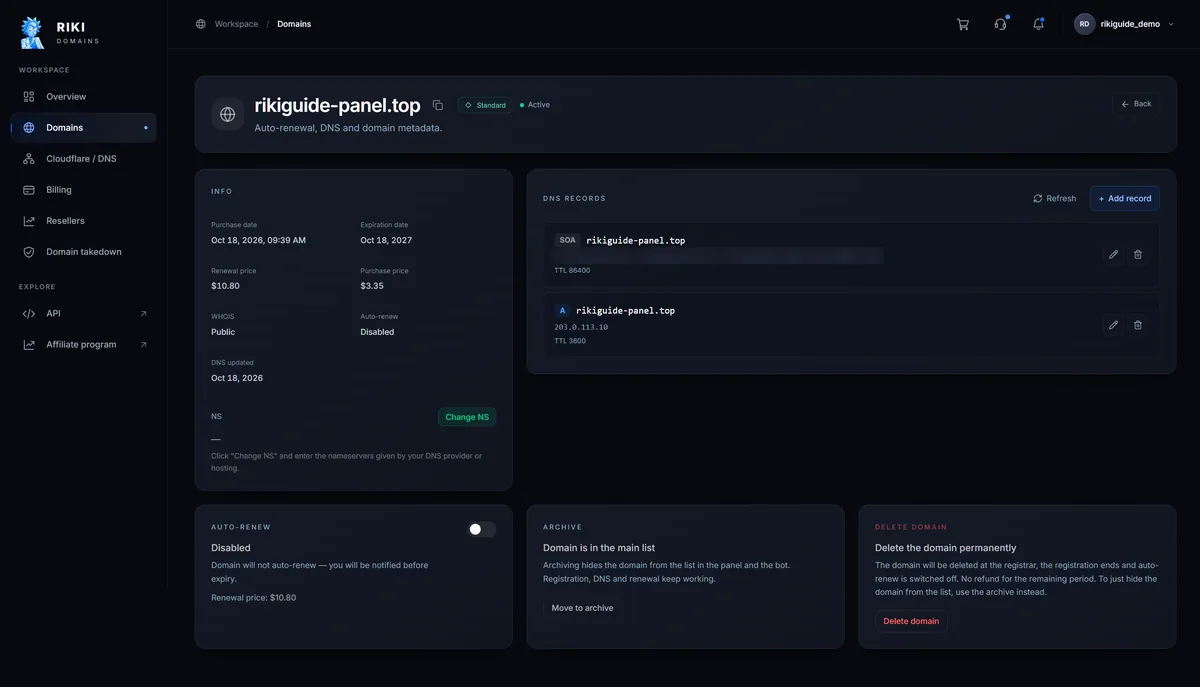
In the example the .top renewal price is $10.80 against a purchase price of $3.35: the first year in mass-market zones is sold at a registry discount, and the card shows both figures at once.
Step 6. The first DNS record
The Add record button opens a form: record type (A by default; AAAA, CNAME, MX, TXT and NS are also in the list), host (@ for the domain root or a subdomain name), value and TTL (1 hour by default). For a site on the server 203.0.113.10 that is type A, host @ for the root or www for the subdomain, and the address as the value.
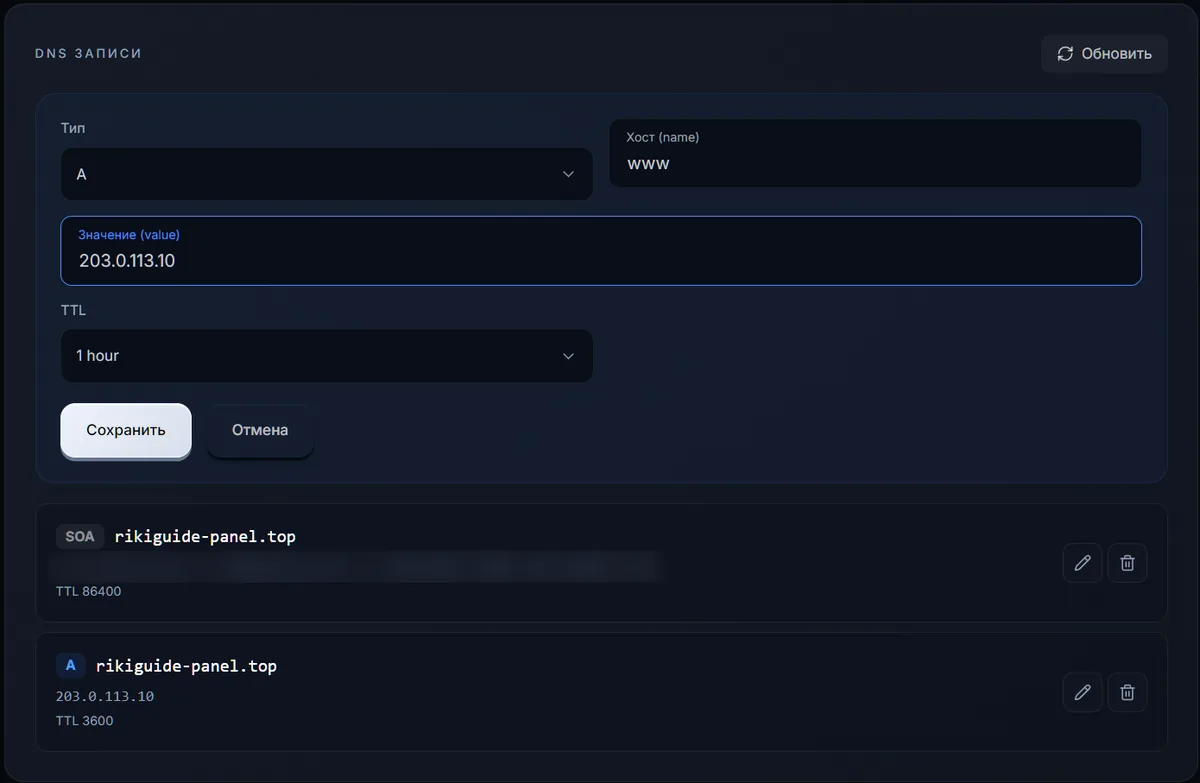
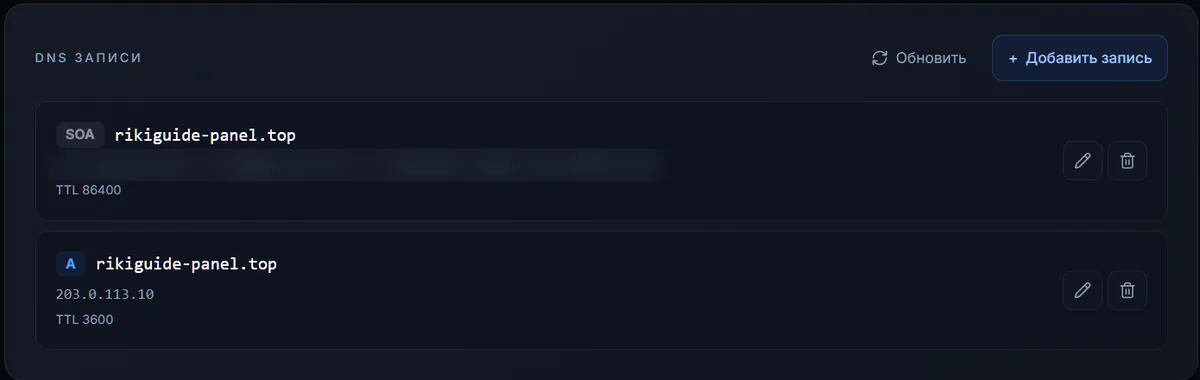
After saving, the record appears in the list together with the zone's service SOA record. If the domain will run through Cloudflare or a host with its own nameservers, Change NS in the info block is used instead of records here: the panel accepts two to four nameservers. And with Automatic provisioning enabled in the Cloudflare / DNS section, new domains are connected to Cloudflare on purchase.
What Billing shows
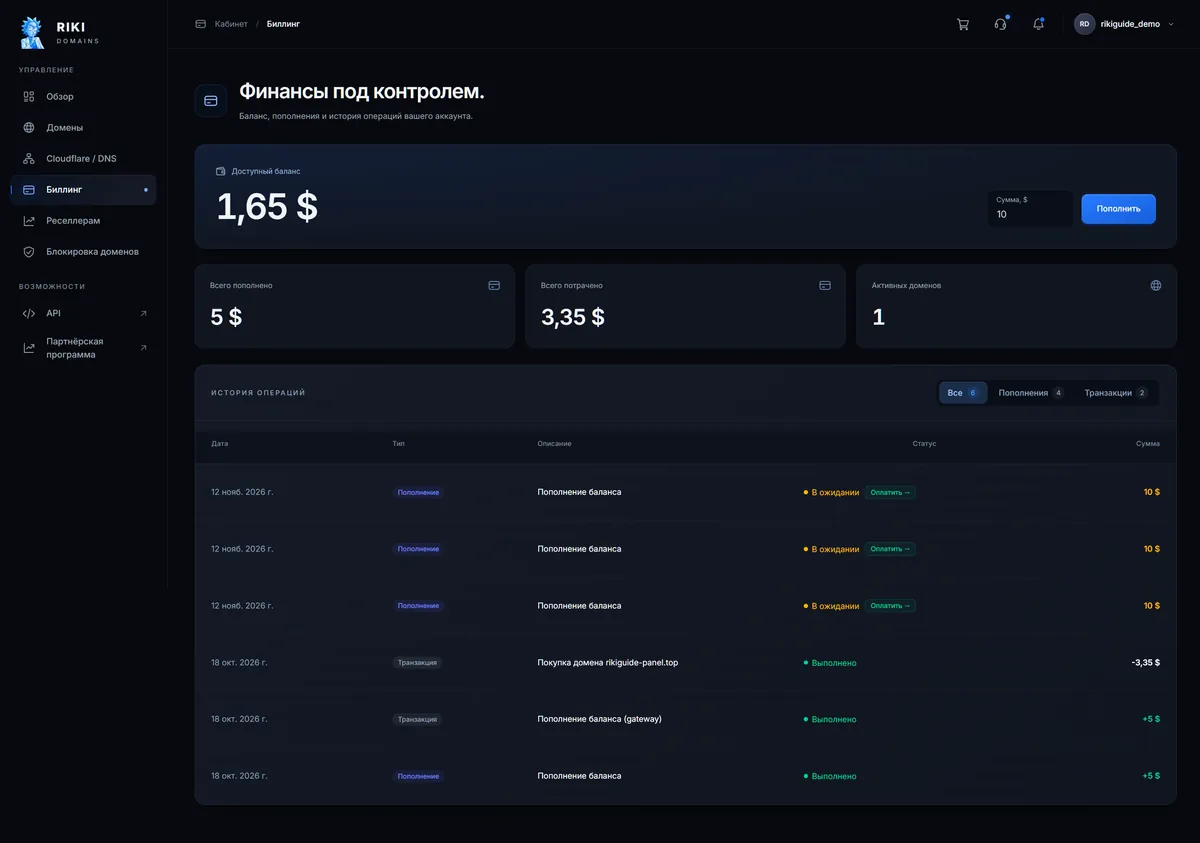
After the purchase the Billing section shows a balance of $1.65, the totals "Total deposited $5", "Total spent $3.35", "Active domains 1" and the operations history: the deposit, the gateway transaction and the domain purchase. Unpaid invoices are listed there too, as pending.
Register a domain in 2 minutes
1,500+ zones, WHOIS privacy on request, crypto payment and DNS management — all inside the Telegram bot.
In short
- Billing → amount → Top up → payment on the payment page with any supported coin.
- Buy a domain → keyword and category → Add to cart.
- Checkout → WHOIS Privacy for $10 if needed → Pay from balance.
- About 20 seconds and the domain is active; the card has DNS records, NS, auto-renew, archive and delete.
If something goes wrong at any step, write to @riki_domains_support with the domain and a screenshot.
FAQ
How long does domain registration take in the panel?
Standard domains are registered automatically. In our example on 18 October 2026 a .top domain became active about 20 seconds after payment and appeared in the list with its expiry date and renewal price.
Can I buy a domain without Telegram?
Yes. Registration in the panel with a login and password, top-up and purchase all happen in the browser. The bot is not needed for this.
Where is WHOIS privacy enabled?
On the Checkout page, with the "WHOIS Privacy for $10" switch on each domain, before payment; the panel lists the option at "+ $10 / year". Without it the domain card shows the WHOIS status as Public.
Why is renewal more expensive than the purchase?
In mass-market zones the first year is sold at a registry discount. In the example .top was bought for $3.35 and the renewal price in the domain card is $10.80. The renewal price is shown in the domain card, no surprises.
Register a domain in 2 minutes
1,500+ zones, WHOIS privacy on request, crypto payment and DNS management — all inside the Telegram bot.